 Play View provides a streamlined GUI with macro controls that conceal the complexity of Rift’s powerful bipolar distortion processing.
If your sounds need a lift, perhaps you need Rift?
Whether you’re working in mainstream pop, experimental electronica or contemporary film/TV scoring, some carefully chosen sonic elements can add an extra dimension to your production that helps you keep the listener’s attention. One of the latest effects plug‑ins designed with precisely this sort of task in mind is Rift, which developers Minimal Audio describe as a bipolar hybrid distortion effect. While the full price of Rift, Minimal’s flagship product, means it’s not in casual‑purchase territory, the launch offer [which is still current when going to press — Ed] discounts it by 40 percent, and Rift Filter Lite makes its filter section available as a separate, more affordable plug‑in that is free during the launch period.
 Rift’s distortion engine offers 30 different distortion modes, ranging from soft overdrive to complete decimation.As its tagline implies, Rift is built around distortion‑based processing. The ‘bipolar’ descriptor is there because you get to apply different distortion processing to the positive and negative elements of your source audio’s waveform. Some 30 different distortion algorithms are organised into five distinct categories, and these start with gentle soft clipping and move through to bit‑crushing and sample‑rate decimation, with multiple stops along the route. On paper, then, there’s the potential here to create almost any type of distortion‑based effect.
Rift For Dummies
Rift offers two modes of operation, courtesy of Play View and Advanced View, which are accessed using two buttons at the bottom‑centre of the GUI. While many elements are common to both, Play View provides a simpler, macro‑based control set, and is ideal when you just want to apply some Rift magic quickly, without having to dig too deeply into how it all works.
At the top of the UI, presets are browsable by category or style tags. Beneath this, Drive controls the input gain, which is used to ‘push’ the distortion processing and includes a ‘x2’ switch, while Output adjusts the signal level leaving the plug‑in and includes an optional limiter, with two modes of operation (gentle and punchy). The Dry/Wet slider offers instant parallel processing, while Stages can be used to add more stages to the distortion engine, for a stronger effect.
The Blend knob and Mode switch start to get us into the bipolar side of things. Hard or Soft Mode adjusts how the engine blends between the Positive and Negative distortion engines, while the Blend knob adjusts the point of transition between the positive and negative portions of the waveform, with the red line in the central Oscilloscope panel providing visual feedback. The Oscilloscope display also shows both the shape of the current distortion engines and, when audio is passing through the plug‑in, the output waveform in real time. This display zone can be toggled to a Filter view, in which you can see what Rift’s filtering is doing. To the left and right of this display, you can select the specific algorithm for the Positive and Negative distortion engines and modify the shape of each distortion response using a macro knob.
 Rift’s modulation provides plenty of options for adding real‑time motion to your sounds.Finally, in the lower strip, alongside the input and output meters, there are two (per preset) pre‑configured macro controls that target multiple parameters in the engine. These Macro knobs, like other controls in the UI, can be automated using your DAW. Each preset also includes pre‑configured modulation; Rift’s full modulation system is extensive, but if modest tweaking of presets is all you require, Play View’s Macro knobs give you enough scope to do some fine‑tuning with a minimum of fuss.
Rift For PhDs
The degree of both control and complexity are taken up a notch or three with the Advanced View’s additional controls. At the centre‑top of the Distortion panel, a Stereo Mode drop‑down selector offers choices between (L‑R) Stereo, which is the default, Wide, Mid/Side, Mid (only) and Sides (only) processing. If you select Mid or Sides, Rift’s processing will only be applied to that component of the stereo signal, with the other passing through unprocessed. In conjunction with the Spread controls on the Feedback and Filter panels, these modes open up some really interesting and useful choices.
 Things get a little busier when you switch to Advanced View, where you have much more control.
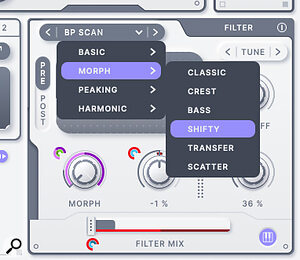
 The impressive Filter panel boasts a huge number of filter types, and it forms the basis of the separate, more affordable plug‑in, Rift Filter Lite.Advanced View also includes the Filter panel in which, alongside some conventional‑looking filter controls, you’ll find an impressive array of filter types and options to place the filter pre‑ or post‑ the distortion engine, and to blend the processed and unprocessed signals. You can also toggle the filter on/off. Cutoff can be set in Hz, to track MIDI notes, or to a specific note. In the latter two modes, the Filter panel’s small keyboard icon can be popped open, and it’s here that you can select which notes the Cutoff is allowed to snap to. It’s a very cool idea and works well, though the manual could perhaps do a better job of explaining it. Depending on which filter type is selected, the Morph control can create real‑time shifts in the filter form, while the Spread control adjusts the relative Cutoff values for the left/right channels, allowing you to further manipulate the stereo image.
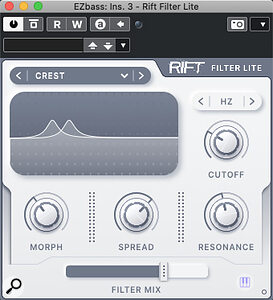
 Rift Filter Lite presents the Filter section from the full version as a standalone plug‑in.Incidentally, this Filter panel is essentially what you get in Rift Filter Lite. That plug‑in obviously lacks the pre‑/post‑ option, and the internal modulation system is gone too — but you can, of course, modulate the controls using your DAW’s automation system.
Bottom‑left, the Feedback panel can also be toggled on/off. This panel lets you return a proportion of the output signal to the input, and can be used to create delays and chorus‑style modulation effects, as well as to generate even more complex distortion effects; engaging the Distort button passes the signal back through the Distortion engine. You can set the feedback amount, switch between stereo and ping‑pong modes, apply high‑ and low‑pass filters and adjust the wet/dry balance.
The Feedback panel’s Frequency settings can prompt some head scratching. In Tune mode, they can be used with the Frequency Pitch Map to create pitch‑based treatments, while Time mode accesses more conventional delay‑style effects. With both automation and modulation available, this powerful facility can initially seem daunting but it’s worth persevering; the presets leave you in no doubt about the sonic fun to be had.
 Rift can also create pitch‑based effects, aided by the Frequency Pitch Map options in the Feedback and Filter panels.Between the Feedback and Filter panels, Advanced View provides you with access to Rift’s four internal modulation sources. These are: Follow, LFO, Curve 1 and Curve 2. Follow can apply modulation based on the level of the audio input alongside the more familiar LFO and Curve options. For each modulation source there’s a very capable set of options with which you can get creative. For example, in the two Curve modulators, you get over 50 preset curves that span simple to complex, as well as the option to modify those curves and generate random ones as starting points. Once you’ve tweaked your modulation source parameters to taste, assigning a specific modulator to a target is a simple matter of dragging and dropping from the modulator’s colour‑coded double arrowhead icons onto the target parameter elsewhere in the UI. Individual parameters can receive modulation data from more than one source and the consistent colour‑coding lets you keep track of what’s happening. You can drag up/down on the small circular modulation icons beside a control to adjust the depth of the modulation.
These practical elements of the internal modulation process are implemented well and easy to grasp. However, how best to use them in the overall ‘design’ of your Rift‑based processing is another matter: Advanced View is fun to explore but I have a feeling that it will take many users some time to master.
Riffing With Rift
Whether you nerd out on the bipolar approach, which is something I’ve not encountered before, or just think of Rift as a conventional twin distortion effect applied in parallel, the distortion possibilities and the fine degree of control are hugely impressive. But a quick dance through the beautifully organised presets demonstrates there’s also far more to Rift than distortion. And while the presets ably demonstrate that Rift can deliver sonic mayhem, if you want to bring an element more subtly to your listener’s attention that’s also possible. Indeed, while the engines themselves sound very different, Rift can conjure up some of the same sorts of sonic magic as, say, Output’s Movement.
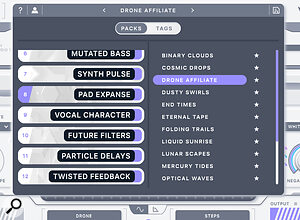
 It’s not all about distortion; Rift boasts an impressive collection of presets that deliver a diverse range of creative treatments.If you’re stuck with an underwhelming static synth pad or bass, then Rift is quite a tool to throw at the problem! Whether you want the sound to rage, or to give it a strong rhythmic element (for which the Chop & Stutter preset category provides a great starting point), Rift is more than capable of making that happen. It did a great job on a real electric bass too, letting me dial in a perfect combination of clean(ish) bottom end and upper‑mid bite. There’s also an impressive collection of presets aimed at drums: those in the Drum Heat category can easily be dialled in to add an extra spice to an acoustic kit, while the more extreme settings used in many of the Beat Damage presets will inject plenty of character into almost any electronic drum track.
It’s not just synths and drums though; Rift has ear‑candy for almost any occasion. Many of the presets work just as well with guitars and there are some categories of presets are aimed at vocals. Of course, there are also more ‘vanilla’ preset types offering conventional overdrive/distortion effects, straightforward filter effects, delays, and sweep/riser effects.
The Gift Of Rift?
Rift undoubtedly ticks the boxes as a sound design tool and, in presenting it with the two‑tier Play/Advanced View GUI, Minimal have pulled off a neat trick: they’ve made it simultaneously accessible and easy to use, and powerful and complex, and that means it should appeal to a wide range of users. If distortion and filtering needs are more conventional, there are certainly cheaper and simpler options out there, including those provided in most modern DAWs, and Rift might be overkill for those sorts of users.
If you’re stuck with an underwhelming static synth pad or bass, Rift is quite a tool to throw at the problem!
As with many other high‑end creative effects plug‑ins, Rift’s sonic fun does demand a good chunk of your CPU resource, and on less‑well‑endowed computers or in busier projects, this might require some management.
But whether in the context of music creation or sound design, those that are prepared to dig a little deeper will undoubtedly find plenty of sonic treasure here. If you find plug‑ins such as SugarBytes’ Turnado, Output’s Movement, NI’s Molekular or iZotope’s Stutter Edit appealing, Rift’s Advanced View should be right up your street. It’s deep, powerful, and capable of taking even the blandest of sound sources and transforming it into something your listener simply won’t be able to ignore.
The bottom line, then, is that Rift is powerful, creative, deep and full of sonic possibilities. It’s well worth a try. And if you’re not persuaded yet, note that Minimal Audio have a 30‑day full refund policy, which reduces the financial risk for the undecided!
Pros
- Powerful processing options that can totally transform sounds — much more than just another distortion.
- GUI options mean it will suit different types of user.
- Flexible modulation system.
Cons
- Advanced View has a steeper learning curve.
- Not light on CPU use.
Summary
Rift can transform the dullest of sounds into the star of the sonic show, and its clever dual‑format GUI makes the powerful processing accessible to novice and experienced sound designers alike.
Information
$79 when going to press (full price $129).
$79 when going to press (full price $129).
Test Spec
Minimal Audio Rift v.1.0.1; Cubase Pro 11.0.30. iMac running OS X 10.15.7, 3.5 GHz Intel Core i7, 32GB RAM.
System Requirements
- Windows 10 or Mac OS 10.9 or higher.
- Host supporting 64‑bit AU, VST 2.4 or VST 3.
- Internet connection required for activation.
